Thermo King Alarm 10.

The Thermo King alarm 10 indicates that the unit has detected high discharge pressure. Discharge pressure is the pressure of the refrigerant as it exits the compressor.

Possible causes of alarm code 10 include:

  • Restriction in the discharge line.
  • Defective or clogged expansion valve.
  • Issues with condenser cleaning or fan failure, causing low airflow.
  • Overcharged refrigerant.

The alarm 10 thermo king can be described in the following table:

Alarma 10 thermo king
RojoTake immediate action. High compressor discharge (or temperature).
If the unit shuts down, repair immediately. Otherwise, report the alarm at the end of the day.

Fault Code Thermoking 10:

This alarm is related to a higher-than-normal discharge pressure value.

  1. If the fan is belt-driven, check its condition and tension.
  2. Inspect the local gearbox for stuck or worn bearings.
  3. If the condenser fan is electric, verify its voltage supply and motor behavior.
  4. Check if the 12-volt battery is defective. A typical sign of a worn-out battery is if the unit loses power even before activating the starter motor.
  5. Verify if there’s a defective High-Pressure Cutout (HPCO) switch.
  6. The HPCO is located on the top of the compressor.
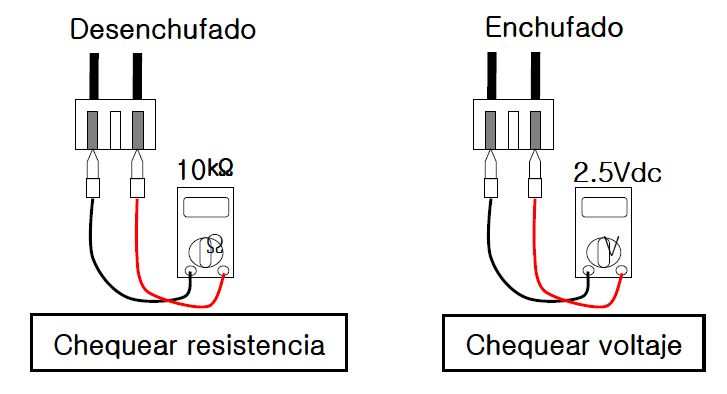
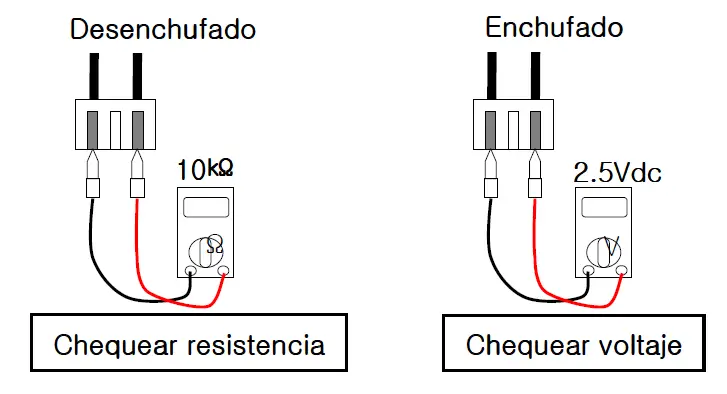
  7. If the unit still doesn’t start, check the voltage of the HPCO switch.
  8. Perform a voltage drop test to check for an open circuit.
  9. Trace the wiring circuit and check the fuses or switches connected to the circuit.

What to do with Thermo King Alarm 10:

In the following video prepared by conforempresarial, recommendations related to alarm 10 thermo king are shown:

  1. Operate the unit in Cooling mode and check the readings of the discharge and suction pressure gauges.
  2. When the system has a vapor injection system for compressor cooling, operate the vapor injection valve to determine if the valve activates.
  3. Check the resistance of the compressor discharge sensor. The resistance in many Thermoking models should be approximately 86 kilohms at 25 ºC (77 ºF). However, check the sensor type of your equipment.
  4. Verify the temperature of the discharge line with a separate digital thermometer and compare it with the High-Pressure Temperature value displayed in the menu.
  5. The unit will operate normally without the compressor sensor. However, the compressor’s high-temperature protection from the controller is not active.

High-Pressure Cutout Switch (Alarm 17):

  • The high-pressure cutout switch (2) is located on the discharge service manifold of the compressor.
  • If the discharge pressure increases too much, the switch opens the circuit to ground of the compressor contactor.
  • The compressor stops immediately.
  • The evaporator and condenser fans continue to operate normally.
  • The controller determines that a high-pressure cutout switch or internal protector has activated.
  • Check the condenser fan operation.

Thermo King Alarm 06.

The Thermo King alarm 06 describes the following behavior:

Código de Alarma 06
Verde=OKCheck the engine coolant temperature sensor.
Report the alarm at the end of the day.

Cause of Fault Code 6 Thermoking:

  • Open circuit.
  • Short circuit.

When the Thermoking system uses a PT1000-type sensor, the system module detects an open circuit problem when the resistance measurement of the sensor circuit is above 1300 Ω. The short circuit of the sensor is detected when the sensor circuit resistance is below 602 Ω.

  • The sensor cannot be examined without disconnecting it.
  • The sensor is a Pt1000, and it has a positive temperature coefficient, meaning that the electrical resistance of the sensor increases with temperature.
  • Rubbing the tip of the sensor with your hands should increase the resistance.
  • You can disconnect both sensors and check their resistance, which should give, in most cases, the same value.
  • The sensor is calibrated to have a resistance of 1,000 Ω at 0 °C.

Check that the temperature sensors have voltage supply, verify the value, and compare with other nearby temperature sensors.

Thermo King Alarm 05.

The Thermo King alarm 05 indicates that the unit has detected an issue with the ambient temperature sensor.

Possible causes of alarm code 05 include:

  • A defective or damaged ambient temperature sensor.
  • A loose or disconnected connection to the ambient temperature sensor.
  • An issue with the unit’s wiring.

The alarm 05 Thermo King can be identified as follows:

Alarma 05 Thermoking
Green = OKCheck the ambient temperature sensor.
Report the alarm at the end of the day.

Cause of Fault Code 5 Thermoking:

The circuit feeding the sensor may be:

  • Open circuit.
  • Short circuit.

When the Thermoking system uses a PT1000-type sensor, the system module detects an open circuit problem when the resistance measurement of the sensor circuit is above 1300 Ω. The short circuit of the sensor is detected when the sensor circuit resistance is below 602 Ω.

Location of the Problem Causing Alarm 05 Thermoking:

  • Defective or incorrect sensor.
  • Defective wiring.
  • Defective regulator.

What to Do with Alarm 05 Thermoking:

  • Check for damaged sensor cables.
  • Verify sensor connections to the controller.
  • In some models, the sensor is a Pt1000, a two-terminal sensor that can be swapped without affecting measurement.
  • Disconnect the sensor and, with a multimeter in the Ω position, measure the electrical resistance between the two sensor cables.
  • The sensor cannot be examined without disconnecting it.
  • When the sensor is a Pt1000, it has a positive temperature coefficient. This means that the sensor’s electrical resistance increases with temperature.
  • The sensor is calibrated to have a resistance of 1,000 Ω at 0 °C.
  • Normal resistance values with the PT1000 sensor can be seen in the following table:
-10 °C960 Ω
0 °C1,000 Ω
+10 °C1,039 Ω
+15 °C1,058 Ω
+20 °C1,078 Ω
+75 °C1,300 Ω

Thermo King Alarm 04.

The Thermo King alarm 04, identified in yellow, initially suggests checking the discharge air temperature sensor in the involved area manually. Check the temperature manually and report the alarm at the end of the day.

Fault Code 4 Thermoking:

Regarding fault code 4 Thermoking, the most common causes are:

  • Open circuit.
  • Short circuit.

When the Thermoking system uses a PT1000-type sensor, the system module detects the open circuit problem when the resistance measurement of the sensor circuit is above 1300 Ω. The sensor short circuit is detected when the sensor circuit resistance is below 602 Ω.

Location of the problem causing alarm 04:

  • Defective or incorrect sensor.
  • Defective wiring.
  • Defective regulator.

What to do with alarm 04:

  • Check for damaged sensor cables.
  • Check sensor connections to the controller.
  • In some models, the sensor is a Pt1000, a two-terminal sensor that can be swapped without affecting measurement.
  • Disconnect the sensor and, with a multimeter in the Ω position, measure the electrical resistance between the two sensor cables.
  • The sensor cannot be examined without disconnecting it.
  • When the sensor is a Pt1000, it has a positive temperature coefficient. This means that the sensor’s electrical resistance increases with temperature.
  • The sensor is calibrated to have a resistance of 1,000 Ω at 0 °C.
  • Normal resistance values with the PT1000 sensor can be seen in the following table:
Temperature °CResistance Ω
-10 °C960 Ω
0 °C1,000 Ω
+10 °C1,039 Ω
+15 °C1,058 Ω
+20 °C1,078 Ω
+75 °C1,300 Ω

Thermo King Alarm 02

The Thermo King Alarm 02 is a critical signal that indicates the unit is not receiving a valid signal from the evaporator coil sensor for the specified zone. This issue can result from various factors, including a faulty or damaged evaporator coil sensor, loose or disconnected connections, or problems with the unit’s wiring.

Causes of Thermo King Alarm 02:

  1. Faulty or Damaged Evaporator Coil Sensor: The primary component responsible for monitoring the evaporator coil temperature may be defective or damaged, triggering Alarm 02 when it fails to transmit a valid signal.
  2. Loose or Disconnected Connection to the Sensor: A potential cause lies in the connections to the evaporator coil sensor. If these connections are loose or disconnected, it can lead to the loss of a valid signal.
  3. Problems with Unit Wiring: Issues in the unit’s wiring, connecting the sensor to the control system, can disrupt the signal transmission and activate Alarm 02.

Description of Thermo King Alarm 02: Alarm 02 is indicated by a yellow light and recommends the following actions:

  • Check the evaporator temperature sensor (zone): Manually verify the temperature to ensure the sensor is providing accurate information.
  • Manually check the temperature: Confirm the temperature manually for further validation.
  • Report the alarm at the end of the day: Document and report the alarm’s occurrence at the end of the day for proper follow-up and resolution.
  1. Open Circuit:
    • Detected when using a PT1000-type sensor, the system module identifies an open circuit if the resistance measurement of the sensor circuit exceeds 1300 Ω.
  2. Short Circuit:
    • Short circuit detection occurs when the resistance of the evaporator coil sensor circuit is below 602 Ω.

Location of the Issue Generating Alarm 02: In a video prepared by conforempresarial, a detailed description of Thermo King Alarm 02 is provided, along with recommendations for addressing the problem. Key verifications include:

  • Faulty or Incorrect Sensor: Check for damaged sensor cables and verify sensor connections to the controller.
  • Defective Wiring: Examine the unit’s wiring for potential faults that may disrupt signal transmission.
  • Voltage Supply Issues due to Defective Regulator: Consider problems related to voltage supply, potentially caused by a defective regulator.

What to Do with Alarm 02?

Temperature Sensor:

  • Inspect sensor cables for damage.
  • Verify sensor connections to the controller.
  • For Pt1000 sensors, check if they are two-terminal sensors that can be swapped without affecting measurements.
  • Disconnect the sensor and use a multimeter in the Ω position to measure electrical resistance between the two sensor cables.
  • Understand that a Pt1000 sensor has a positive temperature coefficient, meaning resistance increases with temperature.
  • Utilize the provided table for normal resistance values at various temperatures.

Conclusion: Effectively addressing Thermo King Alarm 02 requires a systematic approach, considering potential issues with the evaporator coil sensor, wiring, and voltage supply. By following the recommended troubleshooting steps, operators can identify and resolve the root cause, ensuring the unit operates smoothly and preventing disruptions in temperature control.

Thermo King Alarm 03

Thermo King’s Alarm 03 code indicates that the unit is not receiving a valid signal from the return air sensor for the specified zone. This could be attributed to various factors, including a faulty or damaged return air sensor, a loose or disconnected connection to the return air sensor, or issues with the unit’s wiring.

Causes of Thermo King Alarm 03:

  1. Faulty or Damaged Return Air Sensor: The primary component monitoring the return air temperature may experience damage or defects. Alarm 03 is triggered when this sensor fails to send a valid signal.
  2. Loose or Disconnected Connection to the Sensor: A simple connection issue could be the underlying cause. Checking the connections to the return air sensor is crucial to ensure uninterrupted data flow.
  3. Problems with Unit Wiring: If the wiring connecting the sensor to the unit is damaged or poorly connected, it can result in a loss of signal, triggering Alarm 03.
  4. Defective Regulator: The regulator, responsible for maintaining the proper functioning of the sensor, may experience faults affecting data transmission.

Information from Thermo King Alarm 03: Alarm 03 is presented with a yellow light and suggests the following actions:

  • Check (control) the return air temperature sensor (zone): Manually verify the return air temperature to ensure the sensor is functioning correctly.
  • Manually check the temperature: Confirm the temperature manually to corroborate the sensor’s information.
  • Report the alarm at the end of the day: Record and report the alarm at the end of the day for proper follow-up.

Thermo King Alarm 03 Diagnosis

  1. Open Circuit:
    • When the Thermoking system uses a PT1000-type sensor, the system module detects an open circuit if the resistance measurement of the sensor circuit is greater than 1300 Ω.
  2. Short Circuit:
    • Short circuit detection occurs when the resistance of the sensor circuit is less than 602 Ω.

Location of the Issue Generating Alarm 03:

  • Faulty or Incorrect Sensor: Identifying whether the sensor is damaged or improperly installed is essential to resolving Alarm 03.
  • Defective Wiring: Check the wiring for short circuits or loose connections that may affect data transmission.
  • Defective Regulator: Verify the regulator’s status to ensure it is functioning correctly and not impacting the sensor’s performance.

Temperature sensors in Air Conditioners and codes they can generate.

In this post, we will delve into the world of temperature sensors in air conditioners, exploring the different types of sensors commonly found and the potential failure codes they can generate. Temperature sensors play a crucial role in maintaining optimal performance in air conditioning systems, and understanding their functions is essential for diagnosing and resolving issues.

Types of Temperature Sensors:

  1. Local Environment Temperature Sensor:
  2. Measures the temperature of the air return to assess the overall temperature of the conditioned space.
  3. Common failure codes: E4, E2, E1.
  4. Evaporator Temperature Sensor (Well Sensor):
    • Monitors the temperature of the evaporator to detect freezing.
    • Common failure codes: E3, E5, E2.
  5. Capacitor Inlet Temperature Sensor:
    • Measures the temperature of the air passing through the capacitor.
    • Associated failure codes: F1, F6.
  6. Capacitor Outlet Temperature Sensor:
    • Gauges the temperature of the liquid refrigerant leaving the capacitor.
    • Common failure code: F2.
  7. Compressor Discharge Temperature Sensor:
    • Monitors the high-pressure refrigerant leaving the compressor.
    • Critical for preventing compressor overheating, especially with high-temperature refrigerants like R-32.
    • Associated failure codes: F3, F4.
  8. Suction Line Temperature Sensor:
    • Measures the temperature of the refrigerant at the suction of the compressor.
    • Aids in controlling overheating and improving system efficiency.
    • Failure code: FA.

Diagnosing Temperature Sensor Issues:

Regardless of the type of sensor, the diagnostic process remains consistent:

  1. Check Sensor Connections:
    • Ensure proper sensor connections and clean them if necessary.
  2. Verify Sensor Position:
    • Confirm that the sensor is correctly positioned.
  3. Measure Electrical Resistance:
    • Use a multimeter to measure the electrical resistance of the sensor.
    • Compare the reading in kiloohms with the manufacturer’s specifications.
  4. Verify Power Supply:
    • Check the power supply from the card to the sensor.
    • Confirm the voltage using a multimeter (around 2.5 volts is typical).

By following these steps, technicians can effectively diagnose sensor issues and address them promptly.

Conclusion: As air conditioning systems evolve with the integration of inverter technology, the number and types of temperature sensors have increased to enhance system control. Regular maintenance, proper diagnostics, and understanding the role of each sensor contribute to the efficient and reliable operation of air conditioning units.

How many amps does a 1/5 HP compressor consume?

The compressor of a fifth HP is a widely used machine in refrigeration and freezing equipment with a storage volume between 300 and 400 liters. These are often piston-type compressors, mainly used in single-phase installations.

This type of compressor operates with various types of refrigerant gases, with the most common being R134A, R404A, and R600A.

The regular or nominal consumption of a compressor is also known by the acronym RLA.

Comparing the RLA with the consumption of an installed unit allows for precise diagnostic procedures and the detection of possible system failures, such as:

1. Electrical system problems with the compressor. Amperage is an important metric for evaluating the electrical health of the compressor, which can help identify issues in the motor or electrical circuit. For example, when one coil of the compressor is grounded, the consumption is excessive, triggering the thermal overload or overcurrent protector.

2. Diagnosis of the appropriate amount of refrigerant: Amperage can serve as an indicator to verify if the amount of refrigerant in the system is sufficient. Unusually low amperage could be a sign of insufficient refrigerant, while high amperage could indicate an excess.

3. Gas compression. Amperage can also help determine if the compression process of the refrigerant gas is functioning properly. When the compressor motor starts but compression is low, the compressor’s consumption is lower than the nominal value.

4. Identification of pipe obstructions: Issues like pipe obstructions can affect the refrigerant flow and, therefore, the compressor’s amperage. Unusually low amperage can be an indication of obstructions in the capillary.

5. Condenser and evaporator problems. When there are issues with the condenser, the equipment’s consumption is usually higher than normal. When there are issues with the evaporator, the current consumption is usually lower than normal.

Now, let’s look at the regular consumption of a fifth HP compressor based on voltage.

  • A compressor powered by 110 volts has a regular consumption of 1.88 amperes.
  • A compressor powered by 115 volts has a regular consumption of 1.80 amperes.
  • A compressor powered by 120 volts has a regular consumption of 1.73 amperes.
  • A compressor powered by 127 volts has a regular consumption of 1.63 amperes.
  • A compressor powered by 220 volts has a regular consumption of 0.94 amperes.
  • A compressor powered by 230 volts has a regular consumption of 0.90 amperes.
  • A compressor powered by 240 volts has a regular consumption of 0.86 amperes.

What to Do When Air Conditioning Oil Turns Dark: Causes and Solutions.

When your air conditioning system’s oil takes on a dark hue, it’s a clear sign that something is amiss in your system. This issue can be attributed to several factors, and addressing it correctly is crucial for ensuring optimal system performance and longevity. In this article, we will delve into the reasons behind the darkening of compressor oil and provide solutions to this problem.

Why Does Compressor Oil Turn Dark?

Let’s start by understanding the potential causes behind the darkening of air conditioner compressor oil:

1. Pressure Overload

Compressor oil may turn dark when your air conditioning system operates at excessively high pressures over an extended period. This elevated pressure can lead to the creation of tiny carbon particles in the oil, resulting in its darkened appearance.

2. Compressor Overheating

If your system’s compressor experiences internal overheating, the oil can become scorched, leading to the production of carbon particles that darken the oil.

3. Moisture Contamination

In certain instances, the oil may take on a light brown color with white streaks due to contamination by moisture. This kind of contamination can be detrimental to the system and reduce its lifespan.

What to Do When Compressor Oil Is Dark?

Here are some recommended steps to address the issue:

a. System Cleaning

The initial step should be to perform a comprehensive cleaning of your air conditioning system. This process involves removing the contaminated oil and cleaning the pipes and various components.

b. Oil Replacement

After cleaning, it’s imperative to replace the oil with new, high-quality oil. Ensure that the oil you use is suitable for your specific air conditioning system. It’s important to note that the most common practice for determining the amount of oil to replace is by referencing the amount of old oil present in the compressor. Typically, you should add approximately 30% more oil. However, if you have the manufacturer-recommended oil measurement, it’s best to use that precise quantity.

c. Filter Inspection

Inspect and replace the system’s filters as needed. Clogged filters can contribute to oil contamination and negatively impact the performance of the compressor.

Detecting Obstructed Capillary and Refrigerant Gas Shortage in Refrigeration and Air Conditioning

We will explore how to identify whether a malfunction in an air conditioner or refrigerator is due to a lack of refrigerant or an obstructed capillary tube.

Two common issues frequently encountered in refrigeration equipment are the shortage of refrigerant and capillary obstructions. Distinguishing between these problems can be challenging as their symptoms often overlap. In this article, we will outline the distinct symptoms of each issue.

Identifying a Lack of Refrigerant

  1. Low Refrigerant Pressure: A common indicator of refrigerant shortage in refrigeration equipment is lower-than-normal refrigerant pressure on both the high and low sides. This can be measured with a manometer while the equipment is running. The extent of pressure drop depends on the degree of leakage.
  2. Reduced Compressor Amperage: Another telltale sign of insufficient refrigerant is a lower-than-average amperage draw by the compressor. This is due to the reduced energy required for compressing less gas as a result of the decreased refrigerant volume.
  3. Capillary Tube Inspection: To confirm the presence of a refrigerant shortage, check the capillary tube while the equipment is operational. A dry and warm capillary tube is a strong indication of a healthy capillary and further confirmation of the lack of refrigerant.

Identifying an Obstructed Capillary

  1. Refrigerant Accumulation: When a capillary tube becomes obstructed, the refrigerant accumulates in the condenser. Over time, the pressure on the low side drops as there is no refrigerant left to compress; instead, it accumulates in the condenser. The high side pressure in the condenser decreases as the gas condenses into a liquid.
  2. Reduced Compressor Suction: The absence of gas in the compressor’s suction leads to reduced amperage consumption by the equipment. In such cases, you might observe a gradual decrease in the refrigerant pressure at the evaporator and slightly lower amperage compared to the normal range.
  3. Capillary Condition: Remember that a dry and warm capillary tube indicates it is not obstructed. In contrast, if the capillary tube is wet or cold, particularly towards the tube’s end, it signals an obstruction.
  4. Multiple Capillaries: Some air conditioning systems incorporate multiple capillary tubes. If one capillary is obstructed, you’ll notice it’s wet or cold, while the others will maintain a normal temperature. This discrepancy clearly points to an obstruction in the problematic capillary.

By understanding these distinctive symptoms, you can accurately diagnose whether the issue lies in a lack of refrigerant or an obstructed capillary tube in your refrigeration and air conditioning equipment. Proper identification will guide you in performing the necessary maintenance or repairs to keep your equipment functioning efficiently.

Exit mobile version